Driveway Paver Cleaning and Sealing: Full Process
What actually goes into cleaning and sealing driveway pavers — and why skipping steps leads to expensive problems down the road.
Share:

Summary:
If your driveway pavers are looking worn out — stained, faded, full of weeds, or just dull compared to when they were first installed — you’re probably wondering whether cleaning and sealing them will actually make a difference, or whether you’re better off replacing them altogether.
The short answer: in most cases, a proper cleaning and sealing job will make your pavers look dramatically better and protect them from the kind of damage that leads to real replacement costs. But the keyword there is “proper.” The process has more steps than most people realize, and when any of them get skipped, the results either look bad or don’t last. Here’s what the full process actually looks like — and why it matters specifically in Nassau County.
Pressure Washing and Paver Sealing: What the Full Process Actually Involves
Most people think paver cleaning is just pressure washing, and paver sealing is just spraying something on afterward. In reality, both steps require more care than that — and the preparation in between is what determines whether the sealer holds for years or fails within a season.
The process starts with a thorough inspection of the surface. Before any water touches the pavers, we check the joints, look for settled or shifting sections, and identify any staining that needs pre-treatment — oil, algae, rust, or organic growth. Skipping this step means you’re cleaning over problems instead of solving them.
From there, we clean using a professional 20-inch surface cleaner attachment — not a standard pressure washer wand. The difference matters. A wand creates uneven pressure that leaves visible striping across the surface and can blow out the joint sand between pavers. A surface cleaner delivers consistent, controlled pressure across the entire area, which means an even clean without collateral damage.
Pool Paver Cleaning and Sealing: Why Pool Areas Need a Different Approach
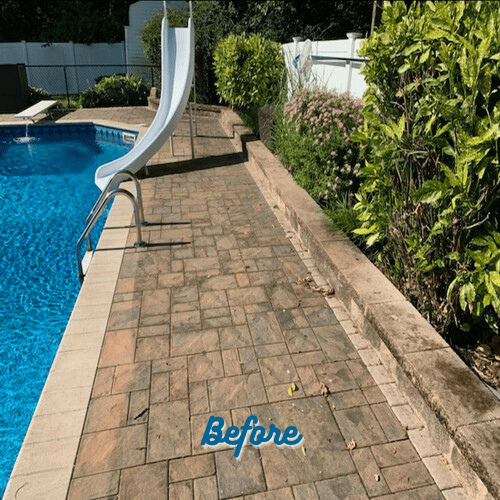
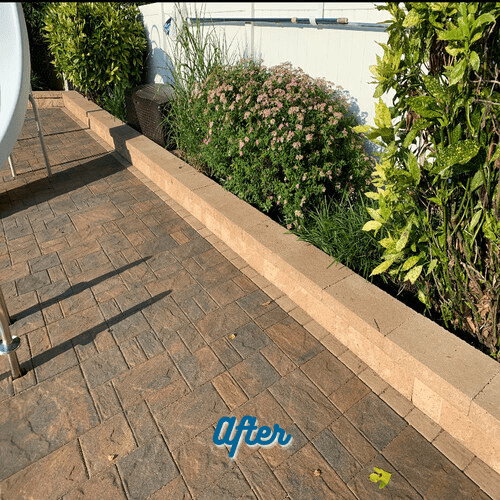
Pool surrounds take more abuse than almost any other paved surface on a property. They’re constantly wet, exposed to pool chemicals, and walked on by bare feet — which means they need to be clean, but they also need to stay slip-resistant. That last part is where a lot of generic sealing jobs go wrong.
Applying the wrong sealer to pool pavers can actually make the surface more slippery when wet, which is a safety issue, not just an aesthetic one. The right sealer for a pool area needs to enhance grip, not reduce it, while still providing protection against chemical exposure, moisture intrusion, and the algae growth that thrives in constantly damp conditions.
The cleaning process for pool pavers also needs to account for the buildup that’s unique to this environment. Calcium deposits from pool water, sunscreen and body oil residue, and the green or black algae that forms along the waterline all require specific pre-treatment before pressure washing. If you just power wash without treating those stains first, you’re likely to push the residue deeper into the paver surface rather than removing it.
After cleaning and a full dry period — which in Nassau County’s humid summers can take longer than homeowners expect — we apply a sealer formulated specifically for pool environments. Water-based urethane sealers work well here because they’re flexible, UV-resistant, and won’t yellow over time the way some solvent-based products do. They also comply with VOC standards, which matters for homes near the water where runoff is a real concern.
One more thing worth noting: pool coping — the cap pieces along the edge of the pool — is often a different material than the surrounding deck, whether that’s natural bluestone, travertine, or a different paver type. Each material responds differently to sealers, and using the wrong product on natural stone can cause discoloration or surface damage. This is exactly the kind of detail that separates a specialist from a general pressure washing company.
Patio Paver Cleaning and Sealing: Getting Your Outdoor Space Ready to Actually Use
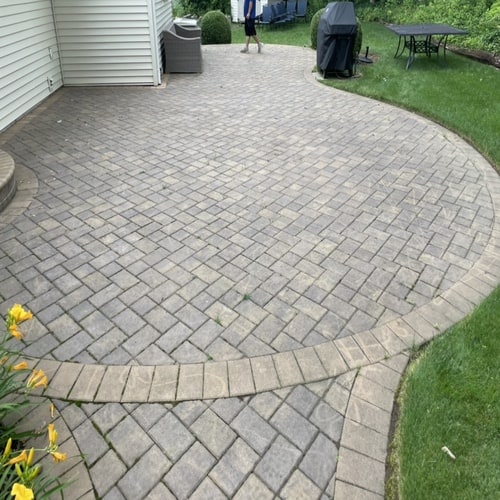
Patios take a different kind of punishment than driveways or pool areas. They deal with food and grease stains from outdoor cooking, furniture scuff marks, and heavy foot traffic concentrated in a smaller area. Shaded patios — which are common in Nassau County’s older, tree-lined neighborhoods from Rockville Centre to Oyster Bay — also tend to develop moss and algae faster than sun-exposed surfaces, because the moisture never fully dries out between uses.
The cleaning process for a patio needs to address all of that. Grease and food residue requires a degreasing pre-treatment before pressure washing; organic growth like moss and algae needs a targeted treatment that kills it at the root rather than just washing the surface layer away. If you skip the pre-treatment and go straight to pressure washing, you’ll often see the staining return within weeks because the source was never addressed.
Once the patio is clean and fully dry, the joint inspection becomes especially important. Patio pavers shift over time — from tree root activity, from freeze-thaw cycles, from the simple settling that happens with any outdoor surface over years of use. Before sealing, we refill the joints with polymeric sand, which activates with water to form a firm, weed-resistant compound. This step is frequently skipped by contractors who want to move quickly, but it’s essential. Sealing over compromised joints means you’re locking in instability and leaving gaps where weeds and water can still get through.
The sealer finish for patios is also worth thinking about. Driveways often benefit from a more durable, high-build sealer that can handle vehicle weight and tire contact. Patios, depending on the look you want, can go anywhere from a matte natural finish that’s nearly invisible to a wet-look gloss that deepens the color of the pavers and gives the space a more finished appearance. Neither is wrong — it’s a matter of preference, and it’s a conversation worth having before the job starts.
How Nassau County's Climate Affects Your Paver Maintenance Schedule
Nassau County isn’t the easiest place to own outdoor pavers. You’ve got hard winters with repeated freeze-thaw cycles, road salt tracked in from driveways and streets, coastal humidity that accelerates algae growth, and summers that are humid enough to slow down sealer curing times. All of that adds up to a maintenance window that’s narrower than most homeowners realize and consequences that are more serious when maintenance gets skipped.
The freeze-thaw cycle is the biggest structural threat. When water gets into unsealed paver joints and the temperature drops below freezing, that water expands — and it does real damage to the joint sand, the paver edges, and over time, the base layer underneath. Multiply that by a typical Nassau County winter with dozens of freeze-thaw cycles, and you can see why pavers that looked fine in October can look noticeably worse by April.
Brick Patio Cleaning and Sealing: What's Different About Brick Compared to Concrete Pavers
Brick is more porous than concrete pavers, which means it absorbs water, staining, and organic growth more readily — and it also means that using the wrong sealer can cause more harm than using none at all. This is one of the areas where material-specific experience makes a real difference.
The most common issue with brick that’s been improperly sealed is efflorescence — the white, chalky mineral deposits that appear on the surface when moisture moves through the brick and evaporates, leaving mineral salts behind. Efflorescence is a natural process, but sealing brick before it’s fully worked itself out, or sealing with a product that traps moisture inside the brick, accelerates it significantly. On older brick patios — and Nassau County has plenty of them, particularly in the established neighborhoods of Garden City, Merrick, and Manhasset — this is a real risk that needs to be managed carefully.
The cleaning process for brick also needs to be gentler than for concrete. Brick can be damaged by excessive pressure, and the surface texture that gives brick its character can be worn down by aggressive washing. We adjust our equipment settings based on the material, which is something that only matters if you actually know what you’re working with.
After cleaning and a proper drying period, brick benefits from a penetrating sealer rather than a film-forming one. A penetrating sealer soaks into the material and protects from within, rather than forming a coating on top. This approach preserves the natural look of the brick, allows the surface to breathe, and avoids the peeling and flaking that film-forming sealers can develop on porous materials over time.
One thing worth knowing: if your brick patio has existing sealer on it that’s failing — peeling, turning white, or looking cloudy — it usually needs to be stripped before new sealer is applied. Sealing over a failing coat doesn’t fix the problem; it compounds it. Stripping is an additional step, but it’s the right one, and skipping it to save time is how you end up with a result that looks worse than when you started.
When Should Nassau County Homeowners Schedule Paver Cleaning and Sealing?
Timing matters more than most people think. Sealing cannot be done when temperatures drop below 55°F — which in Nassau County means the practical window runs from roughly April through October, with the most reliable conditions in spring and early fall. Summer works too, but high humidity can extend drying and curing times, which is worth factoring into scheduling.
The two busiest periods tend to be spring and early fall, and both make sense. Spring is when the winter’s damage becomes visible — joint erosion from road salt, shifting from freeze-thaw cycles, the return of weeds and algae after sitting dormant all winter. It’s also when homeowners start thinking about using their outdoor spaces again and notice that the patio or driveway isn’t looking the way they’d like. Fall is about getting ahead of the next winter — sealing before the freeze-thaw season starts means the pavers are protected going in, rather than playing catch-up in April.
A question we hear often is: how do I know if my pavers actually need to be resealed, or if they’re fine? The easiest test is water. Pour a small amount of water on the surface — if it beads up and sits on top, the sealer is still doing its job. If it soaks in quickly and darkens the paver, the sealer has worn down and the surface is unprotected. Most Long Island pavers benefit from resealing every two to three years, though pavers in shaded areas — common in Nassau County’s older, tree-heavy neighborhoods — may need attention more frequently because of the accelerated algae and moss growth that shade encourages.
One more thing worth addressing directly: the question of whether to hire a professional or do it yourself. The honest answer is that the cleaning step is where most DIY attempts run into trouble. Without a professional surface cleaner, you’re likely to get uneven results and disturbed joint sand. And the sealing step has a significant failure mode that’s hard to reverse — applying too much sealer creates a white haze on the surface that’s difficult to remove. The preparation — proper cleaning, joint refilling, full drying, correct sealer selection — is where the job is either done right or not.
Ready to Restore Your Nassau County Driveway Pavers the Right Way?
Driveway paver cleaning and sealing isn’t complicated, but it does require doing each step in the right order, with the right equipment, and at the right time. When it’s done properly, the results are dramatic — pavers that looked stained, faded, and overgrown come back looking the way they did when they were first installed. When it’s done poorly, you end up with sealer haze, recurring weeds, and a surface that deteriorates faster than if it had been left alone.
Nassau County’s climate — the winters, the salt, the humidity, the coastal exposure — makes this maintenance more important here than in many other parts of the country. It also makes the margin for error smaller. Pavers that aren’t protected going into winter take real damage, and that damage compounds year over year.
If you’re not sure where your pavers stand, or you’ve been putting this off and want to know what it would actually take to get them back in shape, we’re the right call. With nearly 50 years of combined experience working exclusively across Long Island, we’ve seen every condition these surfaces deal with — and we know how to fix them.
Article details:
- Published by:
- Paver Savers
- Published to:
- Last modified:
- July 21, 2026
Share:
Continue learning: