Professional Best Practices for Power Washing Pavers
Not all pavers are created equal — and neither is the equipment used to clean them. Here's what actually works, and what causes permanent damage.
Share:
Summary:
If your pavers are looking rough — stained, faded, weedy, or just dull — power washing seems like the obvious fix. And it can be. But done wrong, it’s also one of the fastest ways to cause permanent damage to a surface that cost thousands of dollars to install. The pressure matters. The nozzle matters. The distance matters. And what you do after the wash matters just as much as the wash itself. This guide walks you through what professional paver cleaning actually looks like, why the technique varies by material, and what you need to know before you start.
Power Washing Brick Pavers Without Damaging the Joints
Brick is one of the most common paver materials across Nassau County — and one of the most mishandled when it comes to pressure washing. The surface looks tough, but brick is porous and the mortar or sand holding those joints together is far more vulnerable than most people expect.
The biggest mistake we see is using too much pressure. Consumer-grade machines from the hardware store commonly run at 3,000 to 4,000 PSI. For brick pavers, the professional standard is closer to 1,200 to 1,500 PSI — less than half of what most rental equipment delivers. Go over that threshold and you’re not just cleaning the surface, you’re eroding it.
Nozzle Angle, Distance, and What Most People Get Wrong
Beyond pressure settings, the angle of the spray and the distance from the surface are what separate a clean result from a damaged one. Holding the nozzle too close — anything under 12 inches — concentrates force on a small area and blasts joint sand out from between the bricks. Pointing the spray directly perpendicular to the surface drives water straight into the joints rather than across them, which accelerates erosion and can undercut the structural stability of the entire paver system.
The correct approach is to hold the nozzle 12 to 18 inches from the surface and work at a slight angle, moving in consistent, overlapping passes. This lifts dirt and biological growth off the surface without forcing water into the joints at high velocity.
Here’s something most people skip entirely: pre-treatment. Before any water touches the surface, specific stain types need targeted cleaners. Oil stains require a degreaser formulated for masonry. Rust needs a rust-specific treatment. Efflorescence — that chalky white mineral deposit that shows up on brick pavers throughout Nassau County, especially in areas with hard water and salt air — requires its own chemistry. Skipping pre-treatment and going straight to the pressure washer means you’re pushing those stains around rather than actually lifting them.
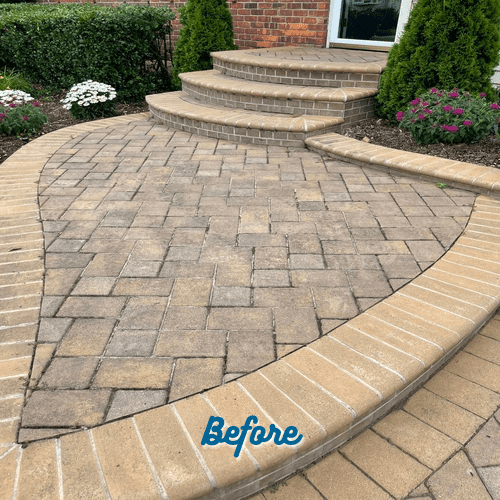
We use a professional 20-inch surface cleaner attachment rather than a standard wand. The surface cleaner delivers circular, overlapping cleaning patterns that produce an even result across the entire surface — no streaking, no zebra striping, no sections that are noticeably cleaner than others. It’s one of those differences that’s hard to explain until you see the before and after side by side.
For brick pavers specifically, the combination of correct PSI, proper nozzle angle, pre-treatment, and surface cleaner coverage is what produces a result that actually looks professional. Any one of those elements missing and you’re leaving results on the table — or worse, leaving damage behind.
Power Washing Pavers with Polymeric Sand: What Happens to the Joints After You Clean
This is the part most homeowners don’t know about — and the part that most generalist pressure washing companies skip. When you power wash pavers, even at correct pressure settings, some amount of joint sand gets displaced. That’s unavoidable. What you do about it afterward is what determines whether your pavers come out of the process more stable or less stable than when you started.
Regular joint sand — the kind that came with your original installation — is loose and granular. Once it’s been partially washed out, it offers little resistance to weeds, ant activity, or further erosion. Refilling the joints with the same loose sand just delays the problem.
Polymeric sand is different. It’s engineered with a binding agent that activates when it gets wet, hardening into a semi-rigid joint that resists erosion, weed infiltration, and the kind of ant tunneling that can slowly destabilize a paver field from underneath. When we clean pavers, we remove the old or broken joint sand and replace it with high-performance polymeric sand as a standard part of the process — not an add-on, not an upsell. The result is that your pavers are actually more structurally sound after we’re done than they were before we started.
This matters especially in Nassau County, where freeze-thaw cycles through the winter months are relentless. Water infiltrates open or depleted joints, freezes, expands, and physically displaces pavers over time. Properly installed polymeric sand significantly reduces that risk by closing off the joint to water infiltration. If you’ve noticed your pavers shifting or lifting after a few winters, depleted joint sand is almost always part of the explanation.
One thing worth knowing: if your pavers already have polymeric sand in good condition, the cleaning process needs to be handled carefully to preserve it. Lower pressure, correct angle, and consistent distance all help. But if the existing polymeric sand is old, cracked, or partially washed out, replacing it after cleaning is the right call — and the professional standard.
Best Way to Clean Pavers Without a Pressure Washer
Not every situation calls for a pressure washer. If your pavers are relatively new, lightly soiled, or made from a more delicate material like travertine or certain natural stones, gentler methods can be appropriate for routine maintenance. Knowing when to reach for a softer approach — and when those approaches hit their limit — is part of working with pavers professionally.
The most common DIY alternative is a 50/50 solution of white vinegar and water. Applied to the surface and left to sit for 15 to 20 minutes before scrubbing, it can handle light surface mold, mildew, and organic staining reasonably well. It’s not going to touch deeply embedded oil, rust, or years of accumulated grime — but for a quick seasonal refresh on pavers that are otherwise in good shape, it’s a reasonable option.
Power Wash Paver Driveway: Why Driveways Need a Different Approach Than Patios
A paver driveway in Levittown or Merrick takes a fundamentally different kind of punishment than a backyard patio. Driveways carry vehicle weight, oil drips, tire marks, and road salt — and they do it year-round. That changes both what needs to be cleaned and how you go about cleaning it.
Oil is the biggest challenge. It penetrates into the paver surface over time, and if you try to pressure wash over it without pre-treating first, you’re essentially spreading it around. A degreaser formulated for masonry surfaces needs to dwell on the stain — typically 10 to 20 minutes — before any water is applied. That gives it time to break the bond between the oil and the paver. Then you clean. Skipping that step is why so many DIY-washed driveways still have shadow stains after the job is done.
The surface area of a driveway also makes the 20-inch surface cleaner attachment especially important. Cleaning a 400 to 600 square foot driveway with a standard wand is slow, inconsistent, and almost guaranteed to leave visible cleaning lines. The surface cleaner covers ground efficiently and evenly, which is the only way to get a uniform result across a large area.
After cleaning, sealing a paver driveway isn’t optional — it’s the step that makes everything else worth doing. Driveways are high-traffic, high-exposure surfaces. A quality sealer repels oil, resists the road salt that Nassau County homeowners use all winter, and protects against UV fading. Without it, a freshly cleaned driveway starts accumulating new staining almost immediately. The sealer is what locks in the result and extends it for years rather than weeks.
One timing note that matters: pavers need to be completely dry before sealer is applied — typically 24 to 48 hours after cleaning, depending on weather conditions. Sealing over damp pavers traps moisture underneath and causes whitening or bubbling that ruins the finish. This is why we schedule around the weather rather than rushing through jobs. It’s not a delay — it’s how the process is supposed to work.
Nassau County Pavers and the Questions Homeowners Actually Ask
**Can I use a rented pressure washer on my pavers?**
You can, but the risk is real. Consumer and rental machines commonly run at 3,000 PSI or higher — more than double the appropriate pressure for brick and natural stone pavers. If you’re set on doing it yourself, use the widest fan nozzle available, stay at least 18 inches from the surface, and keep the pressure as low as the machine allows. But understand that you won’t have hot water capability, a surface cleaner attachment, or the ability to pre-treat stains effectively — and the results will reflect that.
**My pavers are 20 years old. Is cleaning even worth it at this point?**
Almost always, yes. We’ve restored pavers across Nassau County — in Wantagh, Bellmore, Seaford, and Rockville Centre — that homeowners assumed were past saving. Pavers that look completely shot often clean up dramatically well. The ones that genuinely can’t be cleaned are the exception, not the rule. Even pavers with significant shifting or damage can often be restored without full replacement, which would run you roughly $15 per square foot or more.
**Why do my pavers keep getting weeds even after I clean them?**
Because the joint sand is depleted or wrong for the job. Loose joint sand doesn’t hold weeds out — it just gives them a place to root. Polymeric sand, installed properly after a thorough cleaning, creates a hardened joint that weeds can’t easily penetrate. It’s not a permanent guarantee, but it’s the closest thing to one that exists in the paver world. In Nassau County specifically, where the winters beat up joint sand year after year through freeze-thaw cycles, polymeric sand isn’t a luxury — it’s the practical choice.
**How often should I have my pavers professionally cleaned?**
For most Nassau County properties, every one to three years is a reasonable range. Driveways and high-traffic areas tend to need attention more frequently. Patios and walkways in shaded spots — where algae and moss grow faster — often need it on the shorter end of that range. Coastal communities like Long Beach, Atlantic Beach, and Oceanside deal with salt air on top of everything else, which accelerates surface buildup and makes more frequent cleaning worth considering.
Getting Power Washing Right the First Time on Long Island
The difference between pavers that look genuinely restored and pavers that just look wet comes down to technique, equipment, and what happens after the machine is turned off. Pressure settings that match the material, pre-treatment before washing, a surface cleaner that works evenly across the whole surface, polymeric sand in the joints, and a quality sealer applied at the right time — that’s the complete picture.
Nassau County’s climate doesn’t make any of this easier. Between the road salt every winter, the freeze-thaw cycles that displace joints, and the coastal salt air that accelerates surface buildup in communities along the South Shore, your pavers are working against more than just foot traffic. The right process accounts for all of it.
We’ve been doing this work across Long Island for nearly 50 years of combined experience — and we’re straightforward about what your pavers actually need.
Article details:
- Published by:
- Paver Savers
- Published to:
- Last modified:
- August 17, 2026
Share:
Continue learning: